CSS layout made easy

While it hurts my nitpicking handcodeing image to admit it, some frameworks are to good to ignore. One of them I found recently in Google BlueprintCSS. It’s a very flexible framework and with a license “you cannot refuse”.

I”ve used to code all CSS and HTML by hand (still!) and it is getting pretty tiresome to stumble over the same defects in every design I make. To pressed for time I’ve never developed a framework of my own, rather just copy and pasted bits and pieces from my old code that I knew was working.

There are many other CSS frameworks out there but somehow I fell for Google Blueprint though I have far from done an extensive testing on them. If anyone have found any other framework very good and flexible please post a comment, I’d love to hear it.

Surf safely and openly through any firewall

How to surf safe

On a unsecure network where you are afraid that traffic might be sniffed?
Inside a corporate network where the firewall is in your way?
On a network where you do not want to leave a trace of where you’re surfing?

Then this guide is for you! It will enable you to surf any network you’re on as if you where at home.

Requirements

A trusted OpenSSH server that you can administrate (you’re home computer for example?).
Windows: Download and install PuTTY
Linux: Access to the SSH command
Firefox webbrowser

The “secure” site

First of all you have to setup a computer in a network that you trust, you can use your home computer or if there is any other. This computer must run an OpenSSH server.

First off all, we want to change the OpenSSH servers port from 22 (default) to 443 (standard for HTTP SSL traffic). The reason for this is that port 443 is almost always open and usually not monitored by firewalls. To do this log on your home server and type:

sudo nano /etc/ssh/sshd_config

Now find the line that says “Port 22” and change it to “Port 443”. Save the file and exit. Now restart the OpenSSH server.

sudo /etc/init.d/ssh restart

Make sure you’re home network allows access to port 443 to this machine. Now you’re set to use this as you’re home for all surfing.

The “unsecure” network

In order to use our home machine for surfing we need the “unsecure” site to allow us either to use the SSH command or to download and run PuTTY (in Windows). I’ll explain mainly from a Windows client but will also link the Linux-commands that are necessary.

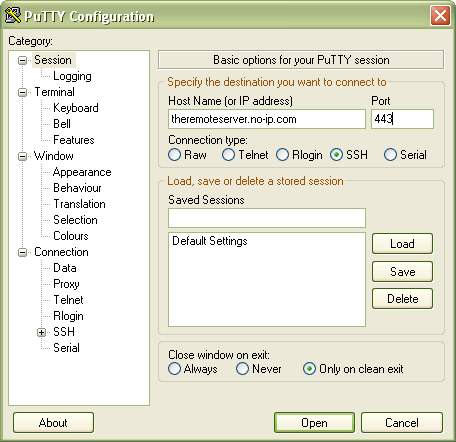
The first thing you need to do is download and install PuTTY in order to use SSH. Once it downloaded start it and try and establish a connection to your OpenSSH server. It might look something like this:

On Linux to connect using SSH on a different port simply write:

ssh user@theremoteserver.no-ip.com -p 443

Try and connect to your home server (tip: the no-ip.com service is great to keep track of dynamic IP home computers). If you type your IP/domain and change to port 443 and choose “open” you should first answer if you trust the computer in question and then be prompted for a username and password. If you log in and it works then we’re set for tunneling traffic through that connection. First disconnect because we need to setup some more parameters for the SSH connection.

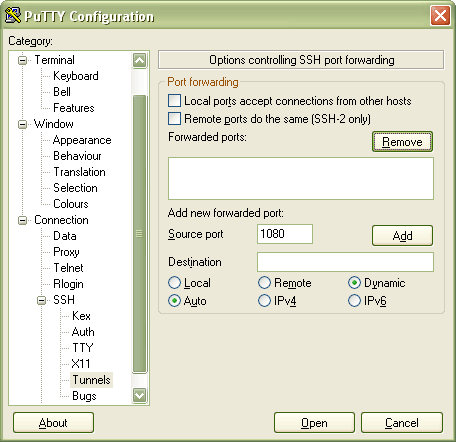
We want to tunnel normal HTTP-traffic.  To do this we need to create a tunnel in SSH, in PuTTY go into “Connection” then “SSH” then “Tunnels” and choose to add a source port, 1080 for example, with dynamic setting. It would look something like this:

In Linux type:

ssh user@theremoteserver.no-ip.com -p 443 -d 1080

When you choose “add” for the port “D1080” should be shown in the “Forwarded ports” area. Now connect using “open” (make sure all the previous settings are still the same with server and port) and you will once again be prompted for username and password which you supply. When this is done the tunnel is open and ready to use.

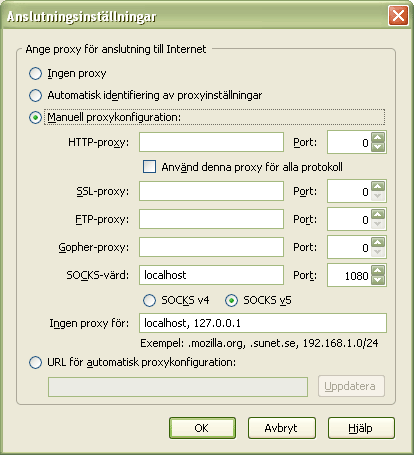
Now start Firefox and choose “Tools” from the menu then “Options” then the “Advanced” tab. Choose “Connections” and modify it to use manual configuration with a Socks host to port 1080 on the localhost. It will look something like this (unfortunately the screenshot is in Swedish):

Once that is done just choose ok and start surfing through the tunnel! A good way to test if it worked is for example http://www.hostip.info/. If the tunnel is working the IP shown there should be that of the OpenSSH server and not the client you are surfing from.

A word of caution: this only tunnels HTTP traffic, the DNS requests are still processed the same way as is e-mail and every other service.

IIS easy restart

One annoying thing about the Microsoft Internet Information Server (IIS) is that it’s quite a few clicks in order to restart it through the normal GUI. If you use it as a development environment and happen to make an infinite loop or some other bad thing it’s annoying to have to go through all those steps every time.

To save some time here is a simple tip, since the IIS run as a normal service simply make a file called “kick iis.bat” (at least that is what I call it) and enter the following:

net stop w3svc
net start w3svc

This should work for the standard installation of IIS. This will take the server down and then back up again, faster than the GUI just double click the file. I keep it on my dekstop… that might give you an idea of how often I trash the IIS hehe.

Perl on Apache2 / Ubuntu 8.04.1 JeOS

Perl acctually works “out of the box” in Apache 2 installed on Ubuntu 8.04 JeOS. I found much confusion on this subject while browsing the Internet so I thought I’d post a simple HOWTO to get the first script running.

First you need a Ubuntu 8.04.1 JeOS server with a LAMP installation, see my previous guide on how to make one.

The first thing that can be confusing is where to find the right configuration files for Apache, while not needed for this guide I thought I’d post the current version for this guide here. A good overview of all distributions / versions can be found over at the Apaches wiki.

Debian, Ubuntu (Apache 2):

ServerRoot              ::      /etc/apache2
DocumentRoot            ::      /var/www
Apache Config Files     ::      /etc/apache2/apache2.conf
                        ::      /etc/apache2/ports.conf
Default VHost Config    ::      /etc/apache2/sites-available/default, /etc/apache2/sites-enabled/000-default
Module Locations        ::      /etc/apache2/mods-available, /etc/apache2/mods-enabled
ErrorLog                ::      /var/log/apache2/error.log
AccessLog               ::      /var/log/apache2/access.log
cgi-bin                 ::      /usr/lib/cgi-bin
binaries (apachectl)    ::      /usr/sbin
start/stop              ::      /etc/init.d/apache2 (start|stop|restart|reload|force-reload|start-htcacheclean|stop-htcacheclean)

Now as I said, Perl is allready working so we just have to find it in our system! As since in the chart above the cgi-bin is located in /usr/lib/cgi-bin. Here we want to put a Perl Hello World script.

sudo nano /usr/lib/cgi-bin/test.pl

In the script I type the following very standard Hello World script:

#!/usr/bin/perl -w
print “Content-type: text/plainnnHello World!n”

We need to make it executable so we chmod it:

sudo chmod 755 /usr/lib/cgi-bin/test.pl

To make sure it’s working a good tip is to try it at the command line first to check for any spelling errors (especially in the header, errors there will lead to a 500 internal server error response).

perl /usr/lib/cgi-bin/test.pl

If it runs and returns the content-type line, two new lines and a hello world then we’re set! Browse to the IP of the server, in my case it’s 192.168.0.16 so I enter:

http://192.168.0.16/cgi-bin/test.pl

Hello World!

Software that impressed me

Few pieces of software have managed to make a deep impression on me, through my ten years I can only remember a few moments I was really impressed with what I had just found or tried. Here are my “highlights” in no particular order. I might want to add that some of these events took place long ago.

Windows 98
The operating in itself was perhaps not so impressive but the hardware support was like nothing I had never seen before. This was put to its edge when I one day moved a harddrive with Windows 98 from one computer to another (due to memory failure on the original computer) and I was deeply impressed that the operating system quickly adapted to the new hardware, installed new drivers, rebooted and then worked!! Not only did it work for the moment but I remember that computer running for at least a month or so before I reinstalled it anyway since I wanted to be sure as to have no internal conflicts within the operating system. If I had tried this with Windows 95 or earlier I’m sure the computer would have found a way to vaporize, explode or otherwise mutilate itself.

Google Earth
Where there anyone not impressed when they first saw Google Earth? It’s an amazing piece of software, one thing is to invent it but it’s a whole other thing to acctually implement it and get it to work! Truly amazing.

rsync
I do not know how old this command is, I just found it a year or so ago, but it is like the swizz army knife of backups! I found that I could with ease sync very large folders over remote connections using SSH and not have to worry to much about transmission payload! This wonderful command calculates the difference between the two folders, at both ends, and then syncs the changed contents. While this might not be very impressive rsync takes it one step further, if a file differs it also calculates which parts of the file have changed and only sends the changes! In essence, that 2 Gb log file that keeps changing every night can still be synced since rsync will only keep sending the changes to the file and not the whole file.

VMWare server
I always knew that virutal servers where nothing for me. Boy was I wrong! Almost by misstake I tried out VMWare Server when it became free to use in development and I’ve not stopped using it since! The ability to host several development machines and try out different configurations without have to worry about breaking the servers is great. Just snapshot a server, try whatever you want and if you do not like the result just revert back to the snapshot! The bonus that it hosts several of my development environments on a single PC (or laptop!) is not something I even think about.

Virtual Ubuntu 8.04 JeOS LAMP Server

I’ve found the perfect portable development environment for me! First of all I wanted a virtual environment in VMWare since I have access to that software at several locations. Secondly since I would be using it on laptops I wanted the virtual machine to use as little memory and disc space as possible.

Requirements for this tutorial:

First I create a new virtual hardware for the Ubuntu distribution. Standard options straight through except I choose to have a virtual harddrive split into 2 Gb files and only created when needed (to save space, since this is kind of one of the main points of JeOS). Next I choose the ISO-image of the downloaded JeOS distribution as an imported CD-ROM drive for the virtual machine and boot it up.

Throughout the installation I just make the default choices (with only a few exceptions for country and keyboard layout). The installation is fast and the system is up and running, but no graphics of course! Just a waste on a server machine anyway. The first thing I want is the comfort of continueing from my main computer and therefore I install OpenSSH server.

sudo apt-get install openssh-server

After the installation I can freely connect from any other machine on my network which in my case is much more confortable than sitting peeking into a virtual machine on my serverbox.

To logon remotely I need to know the current IP-adress of the JeOS virutal system, to easily get it I write:

ifconfig | grep -w inet

This will show me the current available IP-adresses on the machine, one of them is the loopback (127.0.0.1) and if there are others (there should be only one with the current installation) those are the public IP-addresses. In my case it’s 192.168.0.16. If you are running IPv6 change “inet” to “inet6” to get the public IPv6 IP address.

After I logon (in my case using PuTTY from a Windows machine) I start the process of making it a LAMP server (Linux Apache MySQL PHP5). To make things easy Ubuntu provides a command called “tasksel” that packages an installation togheter into one command:

sudo tasksel install lamp-server

This is suprisingly easy, just wait and the only thing the installation asked me about was what root password I wanted for MySQL.

I use nano to edit text files, you might use something else, either way I need to install it since it’s not included in the standard JeOS distribution.

sudo apt-get install nano

Now we need to make MySQL accessible from remote computers (default setting is to only allow localhost). To do this we need to edit the file /etc/mysql/my.cnf

sudo nano /etc/mysql/my.cnf

Please not that this can be considred unsafe since it exposes the MySQL interface to the whole network! This is only done since I want a development machine that I need to administrate remotely (might be from the same computer but with the server running virtually in the background). To change the bind address you have several options, but first off all find this line within my.cnf:

bind-address = localhost

Instead of localhost you can enter the IP you want it to bind to, if you comment out the line MySQL will by default bind to you’re current IP (which is recommended if you have a dynamic IP-address).

Now we need to create a database and give remote access to it. We need to start MySQL on the command line, so we run:

mysql -u root -p

MySQL will now prompt for your password (the one you supplied earlier in the installation) and then you are in. First I create a new database, the purpose of which is to develop WWW-services so I aptly name it “www”.

create database www;

Next I want to grant myself remote access to this database so I run:

grant all privileges on *.* to ‘magnus’@’%’ identified by ‘passwordgoeshere’ with grant option;

Again, this is UNSAFE for production environment, the above command grants limitless access to the database to any host that identifies itself as me with my password. Consult the MySQL documentation for better limited access and also (if you know which host(s) you will need access from) change the wildcard to a specific IP-number.

I can now access and administrate the MySQL database using whichever tools one favours, I recommend the GUI tools from MySQL.

Another handy tool is phpmyadmin, with this php-based GUI you can administrate the MySQL database through the web browser:

sudo apt-get install phpmyadmin

After the installation simply point the web browser to the /phpmyadmin folder on the webserver of the virtual machine. For example if you’re virtual machine have the IP 192.168.0.50 then the address would be http://192.168.0.50/phpmyadmin

Done! You can now run the virtual server with Apache2, MySQL and PHP5 remotely from any computer in your network and administrate it through SSH. At the end of the installation my virtual machine used 720 Mb discspace which should be compared with the several gigabyte discspace used by a standard Ubuntu installation. Also with the absense of graphical interface the memory consumption is very low and the virtual machine can run on as low as 128 Mb of RAM if needed.

I can add as a bonus that when I later installed a SAMBA server and WordPress 2.6 on the virtual machine the size grew in total to just below 800 Mb and memory set at 256 Mb of RAM. This will have to be a topic for another post though.

Updated 2008-08-02
* added instruction of how to obtain the IP-address of the JeOS virtual machine.
* fixed typo in grant statement
Google opens Knols – wiki on ads?

Google opened the doors for the public to the beta Knols. While Knols are very similar to Wikis there are two main overall design differences between the two. First of all while Wikis are “community authored” with a group of people behind most articles the Knols are author dependant. Whoever posts a Knol first becomes the author and moderator of the article. Secondly Knols have a direct interface to Google AdSense making it easy for the author to include ads in the articles, something few community based wikis allow (at least not to the benefit of the authors).

When writing Knols you have several options for each Knol you write (and by the way, Google defines “Knol” as a unit of Knowledge).

As an author you can choose to inlcude other authors or have an open (or moderated) author system much like the Wikis.

The information published in a Knol can be published under three different licenses that the author may choose from; “CC Attribution 3.0”, “CC Attribution-Noncommercial 3.0” and finally “All rights reserved”.

While I do not believe the wikis are in danger (and specifically the Wikipedia) the Knol does open up much more towards companies who might up until now found it pointless to give their information away for free. Being able to publish copyrighted material without losing control over it and at the same time gaining from AdSense published on those pages might interest some.

Small update on Google Analytics

I’ve used the code from my previous post on almost all my sites now a couple of days and all the statistics are still working and I no longer experience any slow loading times using Firefox with NoScript. Until I see either a change in Googles code (that they use a single domain for javascripts) or a new version of NoScript (that makes an exception for Google-related domains if you allow google-analytics.com) I will keep this code as it greatly improves the performance of my website.

Slow loading with Google Analytics

I experienced my pages slowing down when using Google Analytics togheter with my Firefox AddOn NoScript. Since I’m far from the only one using NoScript I found this not acceptable and worked out a possible work around.

The reason for the slow down is likely the timeout of the connection between my domain (where I’ve allowed scripts to run) and Googles domains (where I might or might not have allowed scripts).

Googles code look like this (where “UA-1111111-1” is your tracking ID):

<script type=”text/javascript”>
var gaJsHost = ((“https:” == document.location.protocol) ? “https://ssl.” : “http://www.”);
document.write(unescape(“%3Cscript src='” + gaJsHost + “google-analytics.com/ga.js’ type=’text/javascript’%3E%3C/script%3E”));
</script>
<script type=”text/javascript”>
var pageTracker = _gat._getTracker(“UA-1111111-1”);
pageTracker._initData();
pageTracker._trackPageview();
</script>

The first part of the code creates an obfuscated loading of the script located at google-analytics.com/ga.js. It picks a prefix of www if it’s a standard connection and ssl if it’s  an encrypted connection. The problem is that NoScript does not recognize this code and ends up in a deadlock of wether or not to allow the script to be run. My guess is that there is another script loaded from another domain called googlesyndication.com which fails to enter the NoScript-test and locks the loading of the page.

A possible fix that I’m still evaluating but which should do the trick is the following (code in bold added):

<script src=”http://www.google-analytics.com/ga.js” type=”text/javascript”></script>
<script type=”text/javascript”>
var pageTracker = _gat._getTracker(“UA-1111111-1”);
pageTracker._initData();
pageTracker._trackPageview();
</script>

As you can see I’ve made the obfoscated code clear text code and chosen the http://www-prefix (since I’m not using an encrypted connection for my server). Should you use encryption on your site simply switch http://www to https://ssl instead (this is what the javascript used to do). If you have a page which might be loaded encrypted or normally then you would have to include this choice earlier in a server side script for example.

After this fix Google Analytics works like a charm togheter with NoScript on any script-level setting for me.

Try this at your own risc, this is still experimental to me as well!

Firefox profiles – tips & tricks

With the latest version of Firefox I’ve found myself using more and more Addons for specific purposes. I also started “saveing” open tabs when closing, to easier get back into my blogging / working again. Due to these reasons I found myself wanting a “work Firefox” and a “casual surfing Firefox” (mainly for other people who sometimes use my computer so they don’t “mess” with my work Firefox).

Luckily the profile system in Firefox can solve this quite easily! If you want multiple profiles within the same login on a computer follow these simple steps:

1: access the profile manager

You have to add at least one more profile, or however many you want on the same machine. To do this run firefox with the following argument:  –profilemanager

The easiest way to do this is to change the shortcut destination like so:

“C:Program FilesMozilla Firefoxfirefox.exe” –profilemanager

Please note that the path should not be changed, only the addition of the profilemanager argument.

2: create new profiles

Start Firefox using this command and simply choose “add profile” and name the profiles you want.

3: Create shortcuts to profiles

When you have the profiles you want you can either always use the profile manager (or check the “always ask” checkbox) or you can create custom Firefox shortcuts that opens a particular profile with the -d [profile] argument. For example, to start the defualt profile use the following command:

“C:Program FilesMozilla Firefoxfirefox.exe” -P default

You can now copy the shortcuts and make a shortcut to each profile you want easy access to. Each profile will be totally seperate with own AddOns, History, Tabs and Settings.