Using AJAX to asynchronously load slow XML files

More and more I’ve come across situations where I want to use AJAX to download a XML file to use in the interface but know beforhand that the file will take a long time to load. With asyncroneous download of XML files by JavaScript, which is kind of what the buzz word AJAX is all about, you must be carefull not to leave the client in limbo between a useable interface and a locked up screen.

Unfortunately this script only works in Internet Explorer, useful tips of how to port it properly (with the asynchronous property intact) would be highly appreciated.

Here is a simple description of the basic functions needed to perfom a asynchronous download where the user will have the option to abort.

First we need a simple function that download the XML, this is pretty standard and the code is lovingly ripped off from w3school.com.

function loadXml(sUrl){
	try{
		//Internet Explorer
		xmlDoc=new ActiveXObject("Microsoft.XMLDOM");
	}
	catch(e){
		try{
			//Firefox, Mozilla, Opera, etc.
			xmlDoc = document.implementation.createDocument("","",null);
		}
		catch(e) {
			alert(e.message)
		}
	}
	try{
		xmlDoc.async = 'true';
		xmlDoc.load(sUrl);
	}
	catch(e) {
		alert(e.message)
	}
}

This code is pretty straight forward and I assume you allready know of it, if not read the guide over at W3Schools. The only difference in the above code compared to that from the tutorial over at W3Schools is the flag “xmlDoc.async = ‘true'”. This means that the code will continue executing after the load is called without waiting for the load to finish. This will place the status of the xmlDoc variable in a limbo which can be checked with the “readyState” flag.

To check if our file is ready to use we have a test-loop that will check if readyState changes:

function testReadyLoop(){
	i++;
	if (xmlDoc.readyState == 4){
		// the file has completed the download
		alert('xmlDoc ready to use! Contents:n' + xmlDoc.xml);
		// TODO: add code here of what to do with the file
	}
	else{
		if (!abortXmlLoad){
			// try again in 1 second
			setTimeout("testReadyLoop();",1000);
		}
		else{
			// stop loading the xml file
			xmlDoc.abort();
			alert('Loading of the XML file aborted!');
		}
	}
}

The incrementation of the variable “i” is just a counter that will be used later and the “abortXmlLoad” is a boolean if the loop should continue or not, these will be explained later. What happens in this function is that it first tests if readyState is 4 which indicates that the file is ready to be used, if this is the case we simple show an alert with the contents of the file, here more intelligent code would be placed. If it’s not ready it checks if it should continue waiting for the file or not, if it should it calls itself in 1 second (1000 ms) otherwise it aborts the loading and simply stops.

To abort a download we need to set the “abortXmlLoad” flag to true, a short function is needed for this:

function abortAsyncXML(){
	// set the abort flag to true
	abortXmlLoad = true;
}

Now we have all the functions needed for the asynchronous download, a last function is added to tie them all togheter:

function loadAsyncXML(sUrl){
	// set abort to false and start download
	abortXmlLoad = false;
	i = 0;
	loadXml(sUrl);
	// start loop to check when ready
	testReadyLoop();
}

This function first resets the values of “i” and “abortXmlLoad” and then it calls the download and after that starts the loop to test if the download is ready. The file will now download silently in the background and pop an alert when ready unless someone calls “abortAsyncXml” before that happens.

As you may have noticed there are a few global variables I use across the functions that also need to be added to the top of the script:

var xmlDoc;
var abortXmlLoad;
var i;

To use this script a small form need to be added to the page:

<form>
<input type="button" value="load" onclick="loadAsyncXML('sample.xml');">
<input type="button" value="abort" onclick="abortAsyncXML();">
</form>

This will load the file “sample.xml” and abort if the abort button is pushed. In order to test that the abort button is working you would have to build a slow loading page that simulates long loading time.

I will post a link to the full code and sample later. Hope you found this helpful.
Google Blueprint CSS tutorial

This is a basic tutorial of the first use of Google Blueprint as a CSS layout.

Download Blueprint CSS
Download the main library att Google Code, at the time of this writing that is the file “Blueprint 0.7.1.zip”.
http://code.google.com/p/blueprintcss/downloads/list

There are three folders in the ZIP-file, first you have the “blueprint” folder which contains the ready to use CSS-files (ie.css, print.css and screen.css). While there are more files in that folder we will only concern ourselves with those in directly in the “blueprint” folder and not subfolders.

I will not go into detail about the two other folders, for your information the “lib” folder contains YAML source for the project and the last folder “tests” contains sample pages you can play around with if you’d like.

Fast reference PDF
There is a nice “cheat page” you can print out from a PDF, this is optional though but I found it very helpfull at least while learning the new classes.

Link the CSS-files
All you need to do is copy the three CSS-files in the “blueprint” folder into a directory of your choice in the main HTTP directory. I assume you put them in a subdirectory simply called “blueprint”. Next you need to link them in the HTML-files where you wish to use them, add the following code:

<link rel=”stylesheet” href=”blueprint/screen.css” type=”text/css” media=”screen, projection”>
<link rel=”stylesheet” href=”blueprint/print.css” type=”text/css” media=”print”>
<!–[if IE]><link rel=”stylesheet” href=”blueprint/ie.css” type=”text/css” media=”screen, projection”><![endif]–>

The first CSS defines how to display the page on normal monitors and projectors. The second file is for printing and the last file, surrounded with an IF condition to only be used by Internet Explorer, is specific instructions for the naughty web browsers that do not follow the standards.

Make a HTML file that uses the Blueprint
I assume you know HTML and CSS so I skip the basics and move straight to the new classes that blueprint offers. Simply put you need an outer DIV of the class “container” that will be the parent object of all others. Inside of this you can decleare HTML code as normal. A real simple first page could look something like this:

<div class=”container”>
<div class=”span-24 last”>
<h1>Hello World</h1>
</div>
</div>

The outer DIV is the container of all objects. The second div defines itself as a “span-24” and “last” class. Span-24 is the max width (950 pixels) and will span the entire area inside the container, last is added to signal this is the final column on this row (it’s also the only so in this case maybe a bit overkill).

Now after this it’s very easy to expand the concept, for example to make a “top headline and under menu + content” layout simply write:

<div class=”container”>
<div class=”span-24 last”>
<h1>Hello World</h1>
</div>
<div class=”span-4″>
The menu
</div>
<div class=”span-20 last”>
The content
</div>
</div>

This still doesn’t solve the more complex aspects of CSS-layout when you need everything to be “just right” but with an overall layout made this easy you can focus on the end tweaking instead of re-inventing the basic wheel everytime you need to make a new design.

Conclusion
The absolute best part about the Blueprint CSS is a “small” feature internally namned “rest.css” which is part of the “screen.css” file. This resets all browser settings to one single setting (Firefox, Internet Explorer etc all have slightly different default values for border, margins, padding etc) making cross platform development much much easier. Secondly, and the acctual main purpose, the ability to easily create new columns and layout modifications really improves start up development time of new designs. While the Blueprint CSS just have very basic settings it’s often these basic settings that screw up every new design I make since I tend to aim a little too high everytime I write a new CSS-class.

Surf safely and openly through any firewall

How to surf safe

On a unsecure network where you are afraid that traffic might be sniffed?
Inside a corporate network where the firewall is in your way?
On a network where you do not want to leave a trace of where you’re surfing?

Then this guide is for you! It will enable you to surf any network you’re on as if you where at home.

Requirements

A trusted OpenSSH server that you can administrate (you’re home computer for example?).
Windows: Download and install PuTTY
Linux: Access to the SSH command
Firefox webbrowser

The “secure” site

First of all you have to setup a computer in a network that you trust, you can use your home computer or if there is any other. This computer must run an OpenSSH server.

First off all, we want to change the OpenSSH servers port from 22 (default) to 443 (standard for HTTP SSL traffic). The reason for this is that port 443 is almost always open and usually not monitored by firewalls. To do this log on your home server and type:

sudo nano /etc/ssh/sshd_config

Now find the line that says “Port 22” and change it to “Port 443”. Save the file and exit. Now restart the OpenSSH server.

sudo /etc/init.d/ssh restart

Make sure you’re home network allows access to port 443 to this machine. Now you’re set to use this as you’re home for all surfing.

The “unsecure” network

In order to use our home machine for surfing we need the “unsecure” site to allow us either to use the SSH command or to download and run PuTTY (in Windows). I’ll explain mainly from a Windows client but will also link the Linux-commands that are necessary.

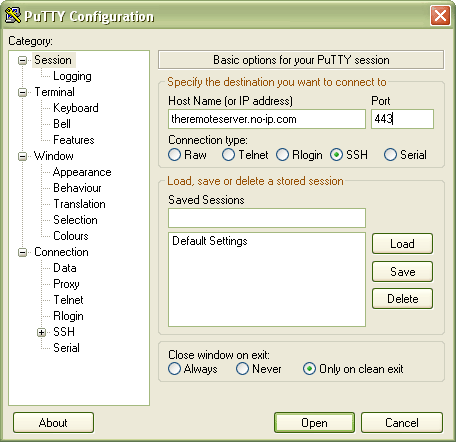
The first thing you need to do is download and install PuTTY in order to use SSH. Once it downloaded start it and try and establish a connection to your OpenSSH server. It might look something like this:

On Linux to connect using SSH on a different port simply write:

ssh user@theremoteserver.no-ip.com -p 443

Try and connect to your home server (tip: the no-ip.com service is great to keep track of dynamic IP home computers). If you type your IP/domain and change to port 443 and choose “open” you should first answer if you trust the computer in question and then be prompted for a username and password. If you log in and it works then we’re set for tunneling traffic through that connection. First disconnect because we need to setup some more parameters for the SSH connection.

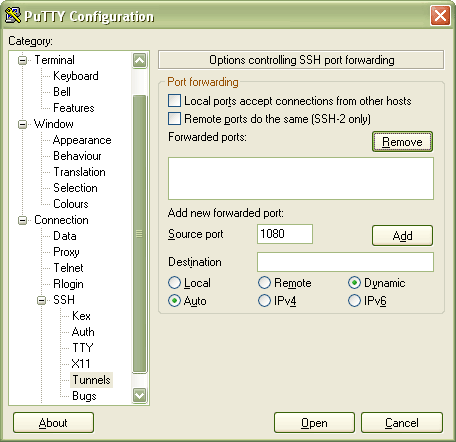
We want to tunnel normal HTTP-traffic.  To do this we need to create a tunnel in SSH, in PuTTY go into “Connection” then “SSH” then “Tunnels” and choose to add a source port, 1080 for example, with dynamic setting. It would look something like this:

In Linux type:

ssh user@theremoteserver.no-ip.com -p 443 -d 1080

When you choose “add” for the port “D1080” should be shown in the “Forwarded ports” area. Now connect using “open” (make sure all the previous settings are still the same with server and port) and you will once again be prompted for username and password which you supply. When this is done the tunnel is open and ready to use.

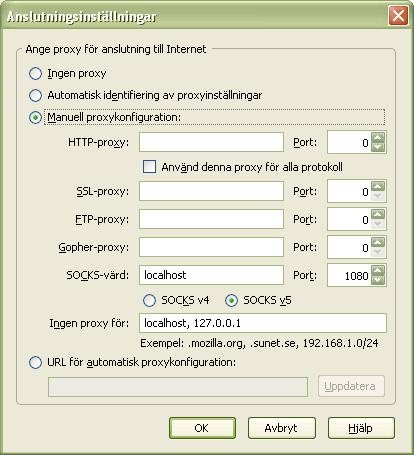
Now start Firefox and choose “Tools” from the menu then “Options” then the “Advanced” tab. Choose “Connections” and modify it to use manual configuration with a Socks host to port 1080 on the localhost. It will look something like this (unfortunately the screenshot is in Swedish):

Once that is done just choose ok and start surfing through the tunnel! A good way to test if it worked is for example http://www.hostip.info/. If the tunnel is working the IP shown there should be that of the OpenSSH server and not the client you are surfing from.

A word of caution: this only tunnels HTTP traffic, the DNS requests are still processed the same way as is e-mail and every other service.