Creating a MySQL Master – Slave connection

I’ve setup several MySQL Master – Slave connections and like to share my procedure. During the trials there are several details I’ve come to learn how to handle and my own set of “best practices”.

The MySQL Master Slave connection works under the premise that “a statement executed on the master should create the exactly same result when executed on the slave given that their database is equal”. For this to work we need to start two servers that are identical and then make one follow the other.

We used MySQL Server 5.5.11 when creating the master slave connection in the guide below. Please consult the MySQL Documentation if you are using a different version.

Step 1: Setup servers
First of all you will need two MySQL-servers. The standard community edition works fine. They should be of the exact same version to avoid any problem that bugs in one or the other might introduce. If you introduce a slave into an existing MySQL server you will need to make plan for a downtime for the duration of running the “mysqldump” command.

TIP: Save the MySQL installation file if you want to add more servers later since you will need the exact same version.

Step 2: Configuration
Edit the my.ini-file off the future master and add the following settings:

# Unique Server ID
server-id=1
# Name of binary log
log-bin=mysql-bin

The Server ID can be any number as long as there are no two servers with the same number in the replication chain, i.e. in our case the slave must have a different number.

The log-bin setting tells the server to make a binary log of every statement executed on the server.

Edit the my.ini file off the future slave and add the following settings:

# Unique Server ID
server-id=2

TIP: Add the setting relay-log=relay-bin to name the relay log. Otherwise MySQL by default uses [hostname]-relay-bin. The problem with the default is that if the host ever change hostname the replication will break. It also breaks if you want to make a copy of the slave to a second slave (if you do not add the setting to the new slave as well).

As mentioned before, the Server ID of the slave needs to be different from the Server ID of the master. When these changes are done, restart the service on both MySQL machines to let the changes take effect. Use the following commands to restart the service:

Linux (requires super user access):

user@host:~$ service mysql restart

Windows (requires administrator privileges):

C:\net stop mysql
C:\net start mysql

After the changes you should see a binary log starting to grow in data data directory of your future master.

TIP: If you have made other modifications to the my.ini file these needs to be copied as well to the slave, otherwise the slave riscs behaving differently from the master.

Step 3: Create a user
The replication will be using a normal user with the replication privilege. I opted to create a new user for this using the following commands:

mysql> CREATE USER 'slave'@'%' IDENTIFIED BY 'mytrickypassword';
mysql> GRANT REPLICATION SLAVE ON *.* TO 'slav'@'%';

The user will be created on the master but if you replicate all databases (as this guide will) then the user will also be replicated to the slave.

TIP: You can use any password you like BUT the password will be visible in plain text on the slave server! In the file master.info that will be created later in this tutorial all the master information will be stored including username and password.

TIP: Make the slave user limited to a certain domain or IP so that security riscs will be minimized. In the above example the user slave can log in from any host.

Step 4: Copy database
Now the time critical portion of this tutorial begins, from here until the datadump is complete the master database will be unavailable for writing.

Execute the following command on the MySQL Master:

mysql> FLUSH TABLES WITH READ LOCK;

Now all tables will be locked so that no transactions can occur. This is required since we need to make a full database dump of the current state of MySQL Master. Next execute the following command:

mysql> SHOW MASTER STATUS;

Write down the reply of the following values: File and Position. An example would be:

File: mysql-bin.00001
Position: 1337

From the command line on the MySQL master issue the following command (change password etc as needed):

C:\mysqldump --user=root --password=rootpassword --all-databases --master-data --result-file=mydump.sql

TIP: Are you using non UTF-8 encoding? Add “–default-character-set=latin1” to the command line where latin1 is the encoding you are using. If you do not supply an encoding MySQL will assume UTF-8.

When the dump is complete and you have a file called mydump.sql you can unlock the tables. Issue the unlock command on the master:

mysql> UNLOCK TABLES;

The master server will now be on-line and working again.

Step 5: Create the slave
Copy the file mydump.sql to the slave server. When it is done execute the following command from the mysql command line (you might have to specify exact location of the mydump.sql file):

mysql> source mydump.sql

TIP: Do NOT use “mysql -u root -p < mydump.sql” from the normal command line since that can corrupt the encoding, again if you use non-standard encoding.

The database on the slave is now identical to what the master from a specific point in time. Now configure the slave to connect to the master and follow it from that point in time.

CHANGE MASTER TO
MASTER_HOST='master.example.com',
MASTER_USER='slave',
MASTER_PASSWORD='mytrickypassword',
MASTER_LOG_FILE='mysql-bin.00001',
MASTER_LOG_POS=1337;

Make sure that MASTER_HOST is the name or IP of the MySQL Master. MASTER_USER and MASTER_PASSWORD are the same as created in step 3 above. MASTER_LOG_FILE and MASTER_LOG_POS are the same as read from step 4 above.

TIP: Since we used the flag –master-data when creating mydump.sql the MASTER_LOG_FILE and MASTER_LOG_POS should allready be set. The remaining settings are however needed.

TIP: Unless you specifically need it I recommend to avoid using binary logging on the slave while it tries to “catch up” with the master. Also the “bin-log” command only triggers logging of commands executed directly on the server, not from replication. To make the slave write replication to it’s own binary log the following setting must be added: “log-slave-updates=1”.

Start the slave with the following command from MySQL command line:

mysql> START SLAVE;

Step 6: DONE
Congratulations, your slave server is now replicating everything on the master server. Depending on how long time it took between step 4 and step 5 the slave should most likely allready have caught up the the master. To check on the status run the following command on the slave server:

mysql> SHOW SLAVE STATUS;

Especially noteworthy fields in this reply are “Slave_IO_State” that informs us of what the slave is up to, most common reply here is “Waiting for master to send event”. “Seconds_Behind_Master” tells us how many seconds behind the slave server is at the moment. If the slave server has been done or restored to an old backup this value can be very high. Normally this value is zero indicating that the slave is up to speed.

TIP: Did you know you can “daisy chain” MySQL servers. Just setup the slave as master to a new slave! There are however some further considerations for doing that, maybe a future blog post!

TIP: The slave server is perfect to use as a “live backup” in case the master should fail. You can also temporarily stop/lock the slave to make a complete database backup without having to worry about downtime of the service. The slave will catch up with the master again once started.

TIP: As with every security meassure in information technology, try this out before trusting how it works! I give NO GUARANTEE OF ANYTHING WRITTEN IN THIS GUIDE, you have to try and verify it yourself. This works for me, it doesn’t necessarily work for you.

More tips, comments or questions? Please feel free to comment below!
ActiveState Perl DBI::ODBC Unicode Error

Using Perl on Windows I’m probably out begging for problems. Using 32-bit Perl on 64-bit Windows I probably deserve it. Reality however does have some needs that go above theoretical best practices.

Recently I ran into a problem with DBI::ODBC that I newly installed with Perl 5.16 on Windows Server 2008 (64 bit). Since Perl for ISAPI only works in 32 bit mode with IIS I naturally ran the 32 bit version of Perl.

All Perl-scripts where moved from our old 32-bit Perl 5.10 Windows Server 2003. They all worked great with one major exception: DBI::ODBC. We kept getting an unexpected encoding (unicode) from all our calls done by ODBC. Fortunately for us someone else had allready run into this problem.

It turns out that as of DBI::ODBC version 1.29 there was added support for unicode that “broke” expected response if one where not using unicode. After some digging into the problem with suggestions to rebuild DBI::ODBC (that I don’t even know how to do on Windows under ActiveState Perl) or encode/decode every variable I finally found what I thought was the easiest solution.

After each connection established with DBI::ODBC driver I added the flag “odbc_old_unicode” and set it to true. This makes all the subsequent calls act as they did before unicode support was added!

$dbh = DBI->connect('DBI:ODBC:MYSOURCE','USER','PASSWORD');
$dbh->{'odbc_old_unicode'} = 1;

Now I just need to find every occurence where a connection is established with ODBC in my Perl scripts… which reminds me that I am on a Windows platform and don’t have access to the “grep” command!

Note: after some digging (since I do not want to install any third party software on the servers) I found the FINDSTR command which was quite handy!

Skicka formulär med “enter”

Jag stötte på ett lite udda problem idag. Ett formulär som tidigare haft en egen submit-knapp skickades nu istället med hjälp av ett javascript. Detta gjorde att möjligheten att skicka formuläret genom att trycka enter på en rad slutade fungera.

Tyvärr ville jag inte ha en submit-knapp längre utan ville fortfarande använda javascriptet för att skicka formuläret. Tyvärr var webbläsaren för smart för att luras av en dold-submitknapp. Jag ville inte heller ha en trigger på varenda fält i formuläret. Lösningen blev istället följande kodrader:

<form ... onsubmit="sendForm();">
...
<input type="submit" value="sök"
  style="background:white;color:white;border:none;">
</form>

Denna kod fungerar perfekt! Knappen syns inte (givetvis om bara om bakgrunden också är vit) och man kan fortfarande trycka enter i vilket input-fält som helst och formuläret skickas då via javascriptet!

Set a static IP in Ubuntu JeOS

I got a few questions about setting a static IP in Ubuntu JeOS. Here is a short and easy step by step guide!

The network settings are stored in the file /etc/network/interfaces and it’s always a good idea to make a backup first in case something goes wrong.

sudo cp /etc/network/interfaces /etc/network/interfaces.bak

When that is done we can safely edit the original file and can always look back or restore the old setting. Now edit the original file:

sudo nano /etc/network/interfaces

Find the part that says “# The primary netwok interface” and change that (and the following two lines)  so it looks like this (change to your desired IP of course!):

# The primary network interface
auto eth0
iface eth0 inet static
address 192.168.0.50
netmask 255.255.255.0
network 192.168.0.0
broadcast 192.168.0.255
gateway 192.168.0.1

Now save the file and restart the network with the following command:

sudo /etc/init.d/networking restart

Done! Now you’re JeOS should be on a static IP-address!

Using AJAX to asynchronously load slow XML files

More and more I’ve come across situations where I want to use AJAX to download a XML file to use in the interface but know beforhand that the file will take a long time to load. With asyncroneous download of XML files by JavaScript, which is kind of what the buzz word AJAX is all about, you must be carefull not to leave the client in limbo between a useable interface and a locked up screen.

Unfortunately this script only works in Internet Explorer, useful tips of how to port it properly (with the asynchronous property intact) would be highly appreciated.

Here is a simple description of the basic functions needed to perfom a asynchronous download where the user will have the option to abort.

First we need a simple function that download the XML, this is pretty standard and the code is lovingly ripped off from w3school.com.

function loadXml(sUrl){
	try{
		//Internet Explorer
		xmlDoc=new ActiveXObject("Microsoft.XMLDOM");
	}
	catch(e){
		try{
			//Firefox, Mozilla, Opera, etc.
			xmlDoc = document.implementation.createDocument("","",null);
		}
		catch(e) {
			alert(e.message)
		}
	}
	try{
		xmlDoc.async = 'true';
		xmlDoc.load(sUrl);
	}
	catch(e) {
		alert(e.message)
	}
}

This code is pretty straight forward and I assume you allready know of it, if not read the guide over at W3Schools. The only difference in the above code compared to that from the tutorial over at W3Schools is the flag “xmlDoc.async = ‘true'”. This means that the code will continue executing after the load is called without waiting for the load to finish. This will place the status of the xmlDoc variable in a limbo which can be checked with the “readyState” flag.

To check if our file is ready to use we have a test-loop that will check if readyState changes:

function testReadyLoop(){
	i++;
	if (xmlDoc.readyState == 4){
		// the file has completed the download
		alert('xmlDoc ready to use! Contents:n' + xmlDoc.xml);
		// TODO: add code here of what to do with the file
	}
	else{
		if (!abortXmlLoad){
			// try again in 1 second
			setTimeout("testReadyLoop();",1000);
		}
		else{
			// stop loading the xml file
			xmlDoc.abort();
			alert('Loading of the XML file aborted!');
		}
	}
}

The incrementation of the variable “i” is just a counter that will be used later and the “abortXmlLoad” is a boolean if the loop should continue or not, these will be explained later. What happens in this function is that it first tests if readyState is 4 which indicates that the file is ready to be used, if this is the case we simple show an alert with the contents of the file, here more intelligent code would be placed. If it’s not ready it checks if it should continue waiting for the file or not, if it should it calls itself in 1 second (1000 ms) otherwise it aborts the loading and simply stops.

To abort a download we need to set the “abortXmlLoad” flag to true, a short function is needed for this:

function abortAsyncXML(){
	// set the abort flag to true
	abortXmlLoad = true;
}

Now we have all the functions needed for the asynchronous download, a last function is added to tie them all togheter:

function loadAsyncXML(sUrl){
	// set abort to false and start download
	abortXmlLoad = false;
	i = 0;
	loadXml(sUrl);
	// start loop to check when ready
	testReadyLoop();
}

This function first resets the values of “i” and “abortXmlLoad” and then it calls the download and after that starts the loop to test if the download is ready. The file will now download silently in the background and pop an alert when ready unless someone calls “abortAsyncXml” before that happens.

As you may have noticed there are a few global variables I use across the functions that also need to be added to the top of the script:

var xmlDoc;
var abortXmlLoad;
var i;

To use this script a small form need to be added to the page:

<form>
<input type="button" value="load" onclick="loadAsyncXML('sample.xml');">
<input type="button" value="abort" onclick="abortAsyncXML();">
</form>

This will load the file “sample.xml” and abort if the abort button is pushed. In order to test that the abort button is working you would have to build a slow loading page that simulates long loading time.

I will post a link to the full code and sample later. Hope you found this helpful.

Google Blueprint CSS tutorial

This is a basic tutorial of the first use of Google Blueprint as a CSS layout.

Download Blueprint CSS
Download the main library att Google Code, at the time of this writing that is the file “Blueprint 0.7.1.zip”.
http://code.google.com/p/blueprintcss/downloads/list

There are three folders in the ZIP-file, first you have the “blueprint” folder which contains the ready to use CSS-files (ie.css, print.css and screen.css). While there are more files in that folder we will only concern ourselves with those in directly in the “blueprint” folder and not subfolders.

I will not go into detail about the two other folders, for your information the “lib” folder contains YAML source for the project and the last folder “tests” contains sample pages you can play around with if you’d like.

Fast reference PDF
There is a nice “cheat page” you can print out from a PDF, this is optional though but I found it very helpfull at least while learning the new classes.

Link the CSS-files
All you need to do is copy the three CSS-files in the “blueprint” folder into a directory of your choice in the main HTTP directory. I assume you put them in a subdirectory simply called “blueprint”. Next you need to link them in the HTML-files where you wish to use them, add the following code:

<link rel=”stylesheet” href=”blueprint/screen.css” type=”text/css” media=”screen, projection”>
<link rel=”stylesheet” href=”blueprint/print.css” type=”text/css” media=”print”>
<!–[if IE]><link rel=”stylesheet” href=”blueprint/ie.css” type=”text/css” media=”screen, projection”><![endif]–>

The first CSS defines how to display the page on normal monitors and projectors. The second file is for printing and the last file, surrounded with an IF condition to only be used by Internet Explorer, is specific instructions for the naughty web browsers that do not follow the standards.

Make a HTML file that uses the Blueprint
I assume you know HTML and CSS so I skip the basics and move straight to the new classes that blueprint offers. Simply put you need an outer DIV of the class “container” that will be the parent object of all others. Inside of this you can decleare HTML code as normal. A real simple first page could look something like this:

<div class=”container”>
<div class=”span-24 last”>
<h1>Hello World</h1>
</div>
</div>

The outer DIV is the container of all objects. The second div defines itself as a “span-24” and “last” class. Span-24 is the max width (950 pixels) and will span the entire area inside the container, last is added to signal this is the final column on this row (it’s also the only so in this case maybe a bit overkill).

Now after this it’s very easy to expand the concept, for example to make a “top headline and under menu + content” layout simply write:

<div class=”container”>
<div class=”span-24 last”>
<h1>Hello World</h1>
</div>
<div class=”span-4″>
The menu
</div>
<div class=”span-20 last”>
The content
</div>
</div>

This still doesn’t solve the more complex aspects of CSS-layout when you need everything to be “just right” but with an overall layout made this easy you can focus on the end tweaking instead of re-inventing the basic wheel everytime you need to make a new design.

Conclusion
The absolute best part about the Blueprint CSS is a “small” feature internally namned “rest.css” which is part of the “screen.css” file. This resets all browser settings to one single setting (Firefox, Internet Explorer etc all have slightly different default values for border, margins, padding etc) making cross platform development much much easier. Secondly, and the acctual main purpose, the ability to easily create new columns and layout modifications really improves start up development time of new designs. While the Blueprint CSS just have very basic settings it’s often these basic settings that screw up every new design I make since I tend to aim a little too high everytime I write a new CSS-class.

Surf safely and openly through any firewall

How to surf safe

On a unsecure network where you are afraid that traffic might be sniffed?
Inside a corporate network where the firewall is in your way?
On a network where you do not want to leave a trace of where you’re surfing?

Then this guide is for you! It will enable you to surf any network you’re on as if you where at home.

Requirements

A trusted OpenSSH server that you can administrate (you’re home computer for example?).
Windows: Download and install PuTTY
Linux: Access to the SSH command
Firefox webbrowser

The “secure” site

First of all you have to setup a computer in a network that you trust, you can use your home computer or if there is any other. This computer must run an OpenSSH server.

First off all, we want to change the OpenSSH servers port from 22 (default) to 443 (standard for HTTP SSL traffic). The reason for this is that port 443 is almost always open and usually not monitored by firewalls. To do this log on your home server and type:

sudo nano /etc/ssh/sshd_config

Now find the line that says “Port 22” and change it to “Port 443”. Save the file and exit. Now restart the OpenSSH server.

sudo /etc/init.d/ssh restart

Make sure you’re home network allows access to port 443 to this machine. Now you’re set to use this as you’re home for all surfing.

The “unsecure” network

In order to use our home machine for surfing we need the “unsecure” site to allow us either to use the SSH command or to download and run PuTTY (in Windows). I’ll explain mainly from a Windows client but will also link the Linux-commands that are necessary.

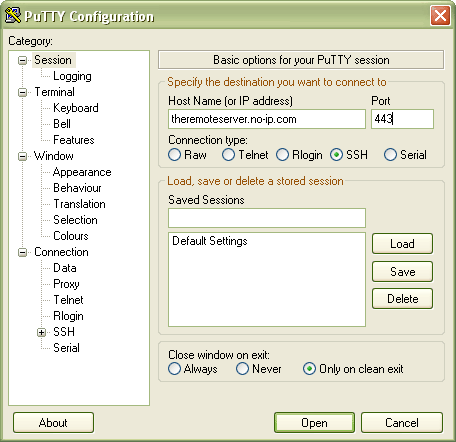
The first thing you need to do is download and install PuTTY in order to use SSH. Once it downloaded start it and try and establish a connection to your OpenSSH server. It might look something like this:

On Linux to connect using SSH on a different port simply write:

ssh user@theremoteserver.no-ip.com -p 443

Try and connect to your home server (tip: the no-ip.com service is great to keep track of dynamic IP home computers). If you type your IP/domain and change to port 443 and choose “open” you should first answer if you trust the computer in question and then be prompted for a username and password. If you log in and it works then we’re set for tunneling traffic through that connection. First disconnect because we need to setup some more parameters for the SSH connection.

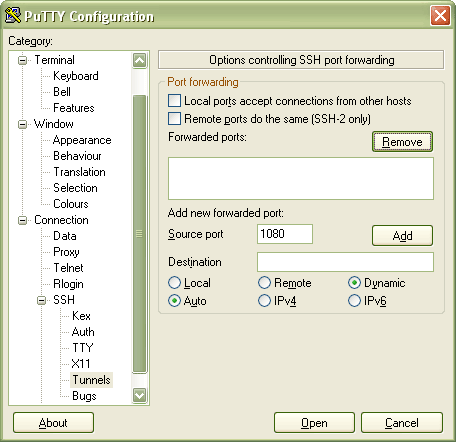
We want to tunnel normal HTTP-traffic.  To do this we need to create a tunnel in SSH, in PuTTY go into “Connection” then “SSH” then “Tunnels” and choose to add a source port, 1080 for example, with dynamic setting. It would look something like this:

In Linux type:

ssh user@theremoteserver.no-ip.com -p 443 -d 1080

When you choose “add” for the port “D1080” should be shown in the “Forwarded ports” area. Now connect using “open” (make sure all the previous settings are still the same with server and port) and you will once again be prompted for username and password which you supply. When this is done the tunnel is open and ready to use.

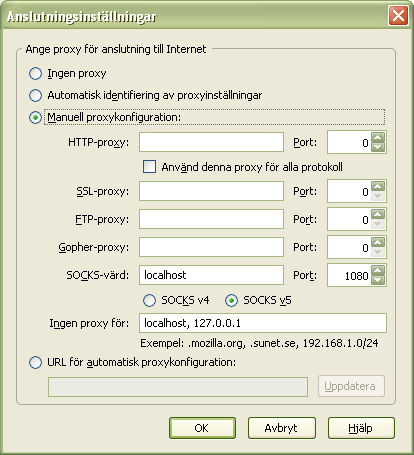
Now start Firefox and choose “Tools” from the menu then “Options” then the “Advanced” tab. Choose “Connections” and modify it to use manual configuration with a Socks host to port 1080 on the localhost. It will look something like this (unfortunately the screenshot is in Swedish):

Once that is done just choose ok and start surfing through the tunnel! A good way to test if it worked is for example http://www.hostip.info/. If the tunnel is working the IP shown there should be that of the OpenSSH server and not the client you are surfing from.

A word of caution: this only tunnels HTTP traffic, the DNS requests are still processed the same way as is e-mail and every other service.

Perl on Apache2 / Ubuntu 8.04.1 JeOS

Perl acctually works “out of the box” in Apache 2 installed on Ubuntu 8.04 JeOS. I found much confusion on this subject while browsing the Internet so I thought I’d post a simple HOWTO to get the first script running.

First you need a Ubuntu 8.04.1 JeOS server with a LAMP installation, see my previous guide on how to make one.

The first thing that can be confusing is where to find the right configuration files for Apache, while not needed for this guide I thought I’d post the current version for this guide here. A good overview of all distributions / versions can be found over at the Apaches wiki.

Debian, Ubuntu (Apache 2):

ServerRoot              ::      /etc/apache2
DocumentRoot            ::      /var/www
Apache Config Files     ::      /etc/apache2/apache2.conf
                        ::      /etc/apache2/ports.conf
Default VHost Config    ::      /etc/apache2/sites-available/default, /etc/apache2/sites-enabled/000-default
Module Locations        ::      /etc/apache2/mods-available, /etc/apache2/mods-enabled
ErrorLog                ::      /var/log/apache2/error.log
AccessLog               ::      /var/log/apache2/access.log
cgi-bin                 ::      /usr/lib/cgi-bin
binaries (apachectl)    ::      /usr/sbin
start/stop              ::      /etc/init.d/apache2 (start|stop|restart|reload|force-reload|start-htcacheclean|stop-htcacheclean)

Now as I said, Perl is allready working so we just have to find it in our system! As since in the chart above the cgi-bin is located in /usr/lib/cgi-bin. Here we want to put a Perl Hello World script.

sudo nano /usr/lib/cgi-bin/test.pl

In the script I type the following very standard Hello World script:

#!/usr/bin/perl -w
print “Content-type: text/plainnnHello World!n”

We need to make it executable so we chmod it:

sudo chmod 755 /usr/lib/cgi-bin/test.pl

To make sure it’s working a good tip is to try it at the command line first to check for any spelling errors (especially in the header, errors there will lead to a 500 internal server error response).

perl /usr/lib/cgi-bin/test.pl

If it runs and returns the content-type line, two new lines and a hello world then we’re set! Browse to the IP of the server, in my case it’s 192.168.0.16 so I enter:

http://192.168.0.16/cgi-bin/test.pl

Hello World!

Virtual Ubuntu 8.04 JeOS LAMP Server

I’ve found the perfect portable development environment for me! First of all I wanted a virtual environment in VMWare since I have access to that software at several locations. Secondly since I would be using it on laptops I wanted the virtual machine to use as little memory and disc space as possible.

Requirements for this tutorial:

First I create a new virtual hardware for the Ubuntu distribution. Standard options straight through except I choose to have a virtual harddrive split into 2 Gb files and only created when needed (to save space, since this is kind of one of the main points of JeOS). Next I choose the ISO-image of the downloaded JeOS distribution as an imported CD-ROM drive for the virtual machine and boot it up.

Throughout the installation I just make the default choices (with only a few exceptions for country and keyboard layout). The installation is fast and the system is up and running, but no graphics of course! Just a waste on a server machine anyway. The first thing I want is the comfort of continueing from my main computer and therefore I install OpenSSH server.

sudo apt-get install openssh-server

After the installation I can freely connect from any other machine on my network which in my case is much more confortable than sitting peeking into a virtual machine on my serverbox.

To logon remotely I need to know the current IP-adress of the JeOS virutal system, to easily get it I write:

ifconfig | grep -w inet

This will show me the current available IP-adresses on the machine, one of them is the loopback (127.0.0.1) and if there are others (there should be only one with the current installation) those are the public IP-addresses. In my case it’s 192.168.0.16. If you are running IPv6 change “inet” to “inet6” to get the public IPv6 IP address.

After I logon (in my case using PuTTY from a Windows machine) I start the process of making it a LAMP server (Linux Apache MySQL PHP5). To make things easy Ubuntu provides a command called “tasksel” that packages an installation togheter into one command:

sudo tasksel install lamp-server

This is suprisingly easy, just wait and the only thing the installation asked me about was what root password I wanted for MySQL.

I use nano to edit text files, you might use something else, either way I need to install it since it’s not included in the standard JeOS distribution.

sudo apt-get install nano

Now we need to make MySQL accessible from remote computers (default setting is to only allow localhost). To do this we need to edit the file /etc/mysql/my.cnf

sudo nano /etc/mysql/my.cnf

Please not that this can be considred unsafe since it exposes the MySQL interface to the whole network! This is only done since I want a development machine that I need to administrate remotely (might be from the same computer but with the server running virtually in the background). To change the bind address you have several options, but first off all find this line within my.cnf:

bind-address = localhost

Instead of localhost you can enter the IP you want it to bind to, if you comment out the line MySQL will by default bind to you’re current IP (which is recommended if you have a dynamic IP-address).

Now we need to create a database and give remote access to it. We need to start MySQL on the command line, so we run:

mysql -u root -p

MySQL will now prompt for your password (the one you supplied earlier in the installation) and then you are in. First I create a new database, the purpose of which is to develop WWW-services so I aptly name it “www”.

create database www;

Next I want to grant myself remote access to this database so I run:

grant all privileges on *.* to ‘magnus’@’%’ identified by ‘passwordgoeshere’ with grant option;

Again, this is UNSAFE for production environment, the above command grants limitless access to the database to any host that identifies itself as me with my password. Consult the MySQL documentation for better limited access and also (if you know which host(s) you will need access from) change the wildcard to a specific IP-number.

I can now access and administrate the MySQL database using whichever tools one favours, I recommend the GUI tools from MySQL.

Another handy tool is phpmyadmin, with this php-based GUI you can administrate the MySQL database through the web browser:

sudo apt-get install phpmyadmin

After the installation simply point the web browser to the /phpmyadmin folder on the webserver of the virtual machine. For example if you’re virtual machine have the IP 192.168.0.50 then the address would be http://192.168.0.50/phpmyadmin

Done! You can now run the virtual server with Apache2, MySQL and PHP5 remotely from any computer in your network and administrate it through SSH. At the end of the installation my virtual machine used 720 Mb discspace which should be compared with the several gigabyte discspace used by a standard Ubuntu installation. Also with the absense of graphical interface the memory consumption is very low and the virtual machine can run on as low as 128 Mb of RAM if needed.

I can add as a bonus that when I later installed a SAMBA server and WordPress 2.6 on the virtual machine the size grew in total to just below 800 Mb and memory set at 256 Mb of RAM. This will have to be a topic for another post though.

Updated 2008-08-02
* added instruction of how to obtain the IP-address of the JeOS virtual machine.
* fixed typo in grant statement